ShopDreamUp AI ArtDreamUp

Deviation Actions


Suggested Deviants


Suggested Collections


You Might Like…


Description
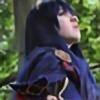
One of the few full body shots I got of my Lucina cosplay.
Wore this to Sakura-Con 2014, and I plan to wear it to PAX Prime 2014 as well.
Worked very hard to get this as accurate as possible. I had about 2 weeks to get this done for Sakura-Con so I did with what I had. Sadly, I didn't have time to make her mask or a very accurate sword.
** If anyone wants a detailed explanation of how this cosplay was made, continue reading. (: **
I had two weeks to make this before con, but I also had several other cosplays to work on at the time (for friends and siblings) so I got time every other day to work on this. Overall it took maybe, 4-5 days. With sleep and breaks. It wasn't to tough just time consuming.
-- THE CLOAK
The cloaks outer layer is a very heavy duty material, it's made from wool which is very costly but that's what the tunic was made from and the colors matched great so in order to look good I had to dish out some cash. u nu ... The inner red layer is made from lightweight polyester, it's a very flowing material and not to costly either.
I didn't have any pattern for the cloak, I kinda just took a swing at it. Which probably wasn't the best idea since I spent a lot of money on the materials. But it turned out great and works perfectly. I laid the fabric down on the floor and cut out a "U" shape from the neck part.
| U |
|__|
The shape looked like the little photo above. Then on the extra fabric on either side of the "U" shape, I attached clasps.
-- THE TUNIC
For the dress I modded a plain blue dress which I picked up from JC Penny. It's also made from wool, which is why I made the cloak from wool. Then I cut it out to her tunic shape and started to mark where my trim needed to be. I got gold bias tape, and iron on infusion. I didn't want to sew the trim on since that sometimes turns out bad and cheap looking. So I put the infusion tape on both sides of the trim and ironed it down. This turned out better than I expected, and is very securely attached onto the fabric. And it was nice that if the fusion tape popped out past the trim, you can just take your iron and iron the extra away. Very clean and neat looking.
-- THE CROWN
It's just made from craft foam, I cut out the shape and hot glued the design onto the foam and spray painted it. Then glued it onto a hair comb and it just slides into the wig.
--THE BELTS (Harness?)
This part was particularly annoying because I couldn't find the right color leather. Then the leather I did find was super stiff and terrible. But eventually I found some belts at Joannes and I had to poke the holes and attach the fasteners. I like the flexibility of the leather and the thickness of it, but the color still isn't the best.
-- THE ARM WARMERS
Just made from left over fabric from the dress.
-- THE PALDRONS
These were actually made in the hotel room, lol. I'm very good at procrastinating!
I used stiff felt, left over fabric from the dress, left over bias tape, hot glue, and some belts to attach to my arms.
I cut the shape out of the felt, hot glued the fabric and bias tape on, and sewed the belts on. Nothing fancy, it took like 10 minutes to make these but they are decent. I'll probably remake them later.
-- THE SWORD
You can't see it in this photo, but it's very sad and terrible. I hate it.
I went to ToysRUs and picked up a Nerf sword, then used markers to color it.
Image size
1062x1600px 2.72 MB
© 2014 - 2024 ConfessionsTetragram
Comments0
Join the community to add your comment. Already a deviant? Log In